Heaven in a Box Feature : Black Forest Cake
I know a lot of people have secret recipes and if they have their own creations, why share them? But being my generous self, I would still share some of my tips in making this cake. Afterall, the best chefs I know share their recipes, right? I still think that you can still add your own personal touch whenever you make your cake.
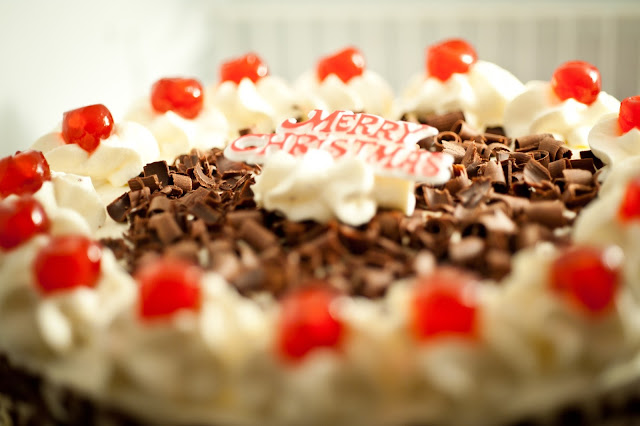
This black forest cake started it all. When I made this back in December (for our own consumption, of course), it fuelled the birth of Heaven in a Box. I never intended to make this cake if not for the left-over glace cherries that I would not throw to waste. Earlier that week, I made an upside down cake and there were some cherries left which made me decide to make this cake for the first time. Since I didn't like the bitter taste of the wine or cherry liqueur, I didn't add any on it and my customers later on, also requested to have it stay that way.

BLACK FOREST CAKE
Cake:
For the cake, I used the same recipe for my moist chocolate cake. If you click on that link, it is the original recipe which uses buttermilk, but I have since used double cream as I have discovered that the cake is more moist. You can find it in this post.
Filling & Frosting:
This is similar to my Cookies & Cream frosting but minus the oreo cookies. In turn you will put the diced cherries for the filling.
1 3/4 cup plus 2 tbsp double cream
3 tbsp icing sugar
1/2 tsp vanilla
100 g French glace cherries (about half for filling and the remaining half for decorating)
baking chocolate (I used Silver Spoon's Dark Chocolate Cake Covering)
Combine the first 3 ingredients and beat on high speed using an electric or stand-in mixer until soft peaks form. Get 16 pieces of cherries and set them aside for topping/decoration later. Chop the remaining cherries and mix them with about half of the frosting or whatever is enough for the cake filling. Use the remaining frosting to ice the cake using a spatula. At this time, you still have some left-over frosting which you need to put in a piping bag with a large star nozzle. Put chocolate curls/shavings on the top and sides of the cake.Pipe large stars on the cake then top them with cherries. For my own personal touch, I have my signature icing at the bottom of the cake using a small star nozzle.
Chocolate Curls & Shavings:
For me, this is the challenging part of this cake. I know there are other techniques to make these which require you to melt the chocolate then spread them, let them dry, scrape, etc. But the easiest way is to use a peeler (yes, the one you use for the potatoes and other veggies) and scrape the blade lengthwise across the chocolate. It has been advised that it is best to let the chocolate melt for a bit, at room temperature and that it's also easier to use milk chocolate rather than dark chocolate as it tends to break apart easily. But I noticed that the dark chocolate gives a distinctive color rather than the light brown of the milk chocolate. I also realised that you need a good brand of chocolate, regardless if it's dark or milk chocolate, so that it won't break apart easily whilst scraping and it scrapes smoothly. After trying different brands, I settled with Silver Spoon's Cake Covering (not the baking chocolate block as it tends to be confused with that). It's easier to scrape and it gives the best curls. Trust me.
NOTES:
I've also learned that in making double cream frosting, the Elmlea brand whips faster. Don't use single cream or light double cream as it won't form any peaks at all. I've tried this and I'll tell you about the disaster in another post. This happened during the holiday peak and we've run out of double cream for the remaining cake orders. The nearest store has run out of them due to the Christmas rush so hubby got me the single cream instead but I've beaten them over and over again in the electric mixer but nothing happened. Too bad I have to learn it the hard way.
This black forest cake started it all. When I made this back in December (for our own consumption, of course), it fuelled the birth of Heaven in a Box. I never intended to make this cake if not for the left-over glace cherries that I would not throw to waste. Earlier that week, I made an upside down cake and there were some cherries left which made me decide to make this cake for the first time. Since I didn't like the bitter taste of the wine or cherry liqueur, I didn't add any on it and my customers later on, also requested to have it stay that way.


BLACK FOREST CAKE
Cake:
For the cake, I used the same recipe for my moist chocolate cake. If you click on that link, it is the original recipe which uses buttermilk, but I have since used double cream as I have discovered that the cake is more moist. You can find it in this post.
Filling & Frosting:
This is similar to my Cookies & Cream frosting but minus the oreo cookies. In turn you will put the diced cherries for the filling.
1 3/4 cup plus 2 tbsp double cream
3 tbsp icing sugar
1/2 tsp vanilla
100 g French glace cherries (about half for filling and the remaining half for decorating)
baking chocolate (I used Silver Spoon's Dark Chocolate Cake Covering)
Combine the first 3 ingredients and beat on high speed using an electric or stand-in mixer until soft peaks form. Get 16 pieces of cherries and set them aside for topping/decoration later. Chop the remaining cherries and mix them with about half of the frosting or whatever is enough for the cake filling. Use the remaining frosting to ice the cake using a spatula. At this time, you still have some left-over frosting which you need to put in a piping bag with a large star nozzle. Put chocolate curls/shavings on the top and sides of the cake.Pipe large stars on the cake then top them with cherries. For my own personal touch, I have my signature icing at the bottom of the cake using a small star nozzle.
Chocolate Curls & Shavings:
For me, this is the challenging part of this cake. I know there are other techniques to make these which require you to melt the chocolate then spread them, let them dry, scrape, etc. But the easiest way is to use a peeler (yes, the one you use for the potatoes and other veggies) and scrape the blade lengthwise across the chocolate. It has been advised that it is best to let the chocolate melt for a bit, at room temperature and that it's also easier to use milk chocolate rather than dark chocolate as it tends to break apart easily. But I noticed that the dark chocolate gives a distinctive color rather than the light brown of the milk chocolate. I also realised that you need a good brand of chocolate, regardless if it's dark or milk chocolate, so that it won't break apart easily whilst scraping and it scrapes smoothly. After trying different brands, I settled with Silver Spoon's Cake Covering (not the baking chocolate block as it tends to be confused with that). It's easier to scrape and it gives the best curls. Trust me.
NOTES:
I've also learned that in making double cream frosting, the Elmlea brand whips faster. Don't use single cream or light double cream as it won't form any peaks at all. I've tried this and I'll tell you about the disaster in another post. This happened during the holiday peak and we've run out of double cream for the remaining cake orders. The nearest store has run out of them due to the Christmas rush so hubby got me the single cream instead but I've beaten them over and over again in the electric mixer but nothing happened. Too bad I have to learn it the hard way.


Comments
Post a Comment